

This Snowy Bunny Mooncake 兔仔冰皮月餅 recipe is one part of my Snowy Mooncake 冰皮月餅 recipe. I separated all the different sections so that you may pick and choose between your favourite skins, fillings, and shapes. To mix and match, here are the links to each:
Mooncake Skins:
Mooncake Fillings:
Mooncake Shapes:
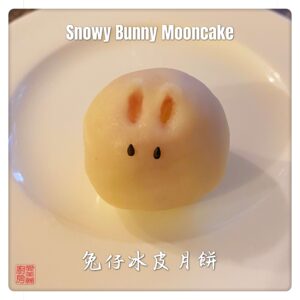
Snowy Bunny Mooncake 兔仔冰皮月餅
Make these cute little animal mooncakes without a mold. They’re easy to make and fun to eat.All measurements are based on a total weight of 50g per mooncake. 25g for the skin, 5g for the yolk and 20g for the filling. If you want to make them different sizes, adjust the ingredients accordingly.The yield for this recipe is 21 50g mooncakes.You can use any colour you like. I used regular food colour for convenience sake.
Approximate cost (CAD) $10
Ingredients
- 4 drop Red food colouring
- ½ drop Blue food colouring (drop 1 drop in a bowl and add colour using toothpick)
- 525 g Snowy mooncake skin dough
- 21 Reconstructed salted egg yolks (5g each)
- 420 g Prepared filling
- 42 Black sesame seeds
- 2 tbsp Cooked glutinous rice flour
- 1 Chopstick with a narrow tip
- 1 pair Plastic food gloves (the dough and filling can be sticky; I highly recommend using these)
Instructions
Cooking glutinous rice flour
- Use a dry, clean pan. Turn heat to medium and add glutinous rice flour
- Stir for 1 minute and turn heat to low
- Cover with lid for 3 minutes
- Remove lid and stir for 1 minute. It’s cooked when the colour turns lightly yellow or when you can smell the glutinous rice aroma
- Remove from heat and set aside
Putting the mooncake together
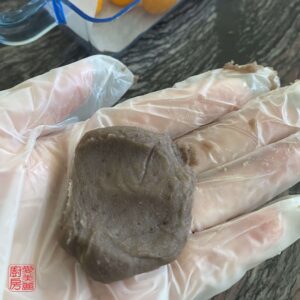
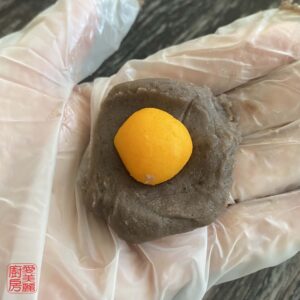
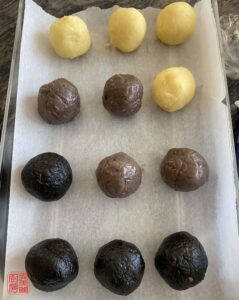
- Prepare your filling by taking 20g of filling, roll into a ball and flatten with your palm

- Place a reconstructed egg yolk in the center and cover it completely with the filling. Roll into a ball and set aside.
- Repeat until all the filling is rolled and put in the freezer for at least one hour
For easier wrapping 
- Take 105g of the mooncake skin and add 4 drops of red food colouring and ½ drop of blue. Blend until evenly mixed. You should get a lavender colour
- Roll into a log shape and cut them into 5 g pieces. Put under plastic wrap to prevent drying out
- Take the rest of the mooncake skin and roll into a log shape. Cut them into 20g pieces. Roll into balls and put under plastic wrap
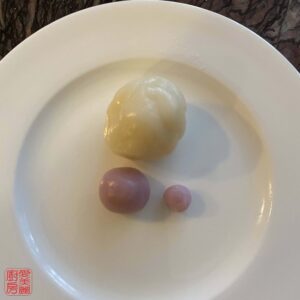
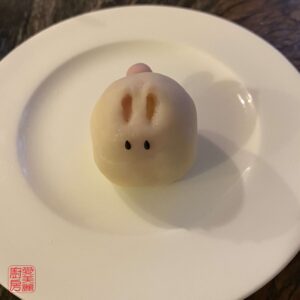
- Take a 20g white mooncake skin, roll into ball. Take one piece of the 5g lavender skin, pinch off a small piece and roll it into a ball for the tail.
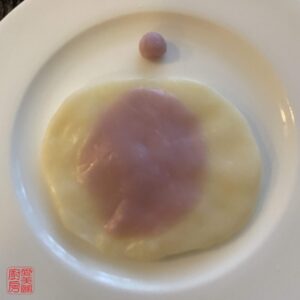
- Press the lavender skin onto the middle of the white skin and press together Putting some lavender on the underside can give it some contrast and show off the ears
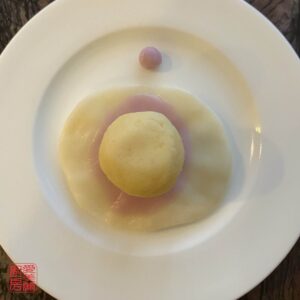
- Put the filling in the middle and wrap the filling with the skin.
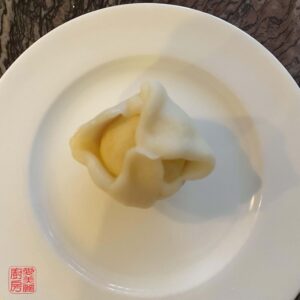
- Close all openings by pressing and pinching the edges together.
- Roll in your palms until smooth. Lightly coat in cooked glutinous rice flour and then roll in palms to even out
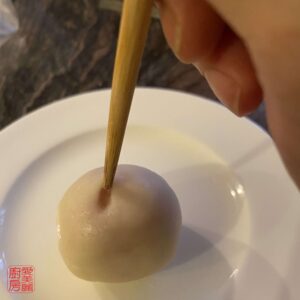
- Use the pointy end of a chopstick to expose the lavender colour to make ears Expose the lavender colour inside the ears
- Affix the black sesame seeds for the eyes and the small ball for the tail with a bit of water I used a cotton swab to dab a tiny bit of water to serve as glue
- Pat the bottom with cooked glutinous rice flour
- Done

Nutrition
Calories: 23kcalCarbohydrates: 2gProtein: 1gFat: 2gSaturated Fat: 1gPolyunsaturated Fat: 1gMonounsaturated Fat: 1gTrans Fat: 1gCholesterol: 3mgSodium: 33mgPotassium: 14mgFiber: 1gSugar: 1gVitamin A: 8IUVitamin C: 1mgCalcium: 25mgIron: 1mg
Tried this recipe?Let us know how it was!
To learn more about the Mid-Autumn, check out this "Mid-Autumn Festival (Mooncake Festival): Celebrations, Greetings, Origins…" post from chinahighlights.com.
Leave a Reply