


Some say that Crispy Sweet and Sour Pork 脆皮咕嚕肉 was a Chinese-American dish and not from China. This simply is not the truth. Sweet and sour pork (咕咾肉,gú laǒ roù) is likely to have evolved from sweet and sour ribs (糖醋排骨, táng cù pái gǔ). This dish dates back to the Sung Dynasty in Zhejiang province. During the Qing Dynasty however, Cantonese chefs started using boneless pork and created a sauce using fresh fruits. For example, pineapples and lychees in plum jam (plum sauce) and vinegar which became the modern sweet and sour pork. It is said that the sweet and sour flavour and fresh fruit could stimulate appetite during the hot summer months.
I usually assess a restaurant by their sweet and sour pork. If it’s good, then the other dishes won't be too bad. It’s one of those dishes that can be found everywhere but not everyone can make it well. I believe that sweet and sour pork should have a batter that is thin and crispy. The meat inside should be hot, tender and juicy. The sauce should be light but flavorful.
My Crispy Sweet and Sour Pork 脆皮咕嚕肉 recipe incorporates some plum sauce to hopefully make the taste a bit more authentic. The batter is crispy without being hard but thick enough to protect the juices inside the meat. I hope you can find fresh lychees when you try making this because the sweet floral fragrance of the lychees makes this dish perfect! Fresh pineapples are wonderful too. And honestly, I don't mind canned pineapples either! (I always have a can of pineapples in my pantry for emergency Sweet and Sour Pork cravings!) I also like adding a thai chili pepper to this dish to give it a bit of a kick. Follow my recipe and you too can make the best sweet and sour pork comparable to any Chinese restaurant!
If you like to deep-fry once in a while, consider getting a digital thermometer. I can now accurately determine the temperature of the oil before putting my food into it. Now, it’s so easy to get perfect results each time. No more guessing when the oil is ready. If you’re interested, check out the one I got from Amazon.
AstroAI Digital Laser Infrared Thermometer ( Not for Human) , 380 Non-Contact Thermomètre Infrarouge, Temperature Gun with Range of -58℉~716℉ (-50℃~380℃), Red, Cadeau(As an Amazon Associate I earn from qualifying purchases)

Crispy Sweet and Sour Pork 脆皮咕嚕肉
Ingredients
- 454 g Pork butt/shoulder/belly , cut into 2.5cm cubes
- 2 cloves Garlic , chopped
- ½ Onion , cut in wedges
- ½ Green Pepper , cut in triangular wedges
- ½ Red Pepper , cut in triangular wedges.
You can use any combination of peppers, approx. 100g in total - 1 Thai chili (optional), chopped or with vertical cut to let out flavor
if you want to make it spicy - 200 g Pineapples (approx. 3 rings if canned), or lychees
- ½ c All-purpose flour
- ½ c Corn starch
- 500 ml Oil for frying.
Amount of oil will depend on the size of your pot
Ingredients for sauce
- 2 tbsp Chinese red vinegar
you can also use rice, apple cider or white vinegars - 1 tbsp Sugar
- 2 tbsp Ketchup (or use 1 tbsp tomato paste, 1 tsp sugar, 1 tbsp water)
- 1 tbsp Plum sauce, Thai sweet chili sauce, or orange marmalade
I once used a packet of McDonald’s Sweet n Sour sauce for their chicken nuggets and it worked too - ¼ tsp Salt
- 1 tsp Corn starch
- 3 tbsp Water
- 2 tbsp Oil
Ingredients for pork marinade
- 1 tsp Shaoxing wine
- ¼ tsp Salt
- 1 tsp Light soy sauce
- 1 tsp Sugar
- 1 Large egg
Instructions
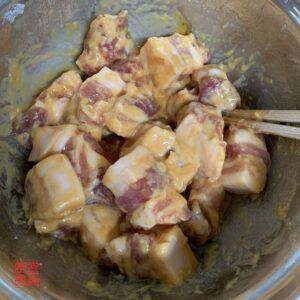
- Add the ingredients of the pork marinade to the pork and mix well and set aside

- Make sauce by combining 2 tbsp Chinese spiced vinegar, 1 tbsp sugar, 2 tbsp ketchup, 1 tbsp plum sauce, and ¼ tsp salt in a container and set aside
This sauce will not give you the bright red color that you find at most restaurants. Using tomato paste instead of ketchup with make the sauce more red - Make slurry for sauce by combining 1 tsp corn starch with 3 tbsp water in a container and set aside
- Combine ½ cup of flour and ½ cup of corn starch and mix together in a bowl. Use 2 tbsp of this mixture and add it to the marinated pork and mix well
- Take a piece of pork and roll it around the flour mixture until it’s completely covered, use your hand to squeeze the pork, shape it into a ball somewhat and place on a plate. Repeat for all the pork pieces
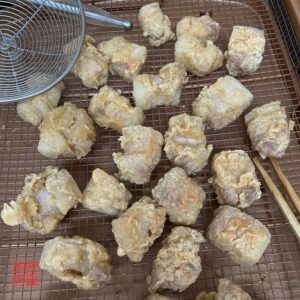
Giving the pork a bit of a squeeze will help to tighten the meat so that it will retain its juice - Heat oil until it gets to 150˚C or 300˚F, put the pork in and gently move them around to ensure even cooking. Cook for approx. 5 minutes, until the outside batter has a light golden color. Remove from heat and let it rest on a cooling rack
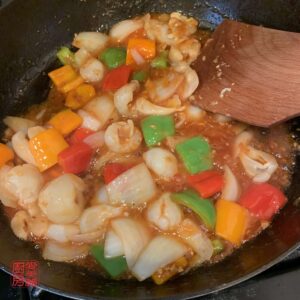
- Heat a pan at medium-high heat and add 2 tbsp of oil
- Add onions and garlic and fry until onions are slightly soft and put into a bowl for later use. Turn off heat and return to finish frying the pork.
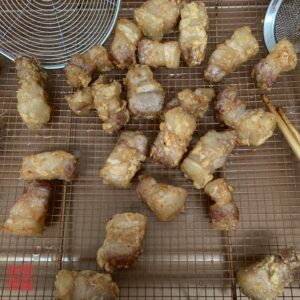
Doing this step before frying the pork for the second time will ensure that both the sauce and the pork will be as hot as possible at the time of serving since onions and garlic take a bit more time to soften in the pan - Bring the deep frying oil to 200˚C or 400˚F. Put all the pork back into the oil and fry for another minute or two until the pork becomes a golden-brown color and remove from heat
- Heat pan to medium-high and add the already cooked garlic and onions; peppers; chilis; and fruit. Stir-fry for 1 minute
- Add the sauce mixture and mix well with the vegetables and fruit
- Stir the slurry (before pouring into the pan). Pour slurry into the pan and mix well with the vegetables and fruit. Turn off heat
- Add the pork into the pan and stir until all the pork pieces are covered with the sauce
- Put everything onto a large plate without having any of the pork stacked on top of each other
This will help to prolong the crispiness of the pork


Leave a Reply